
 1. Brainstorming
I usually doodle out the elements of what I want to do draw to find the best concept, angle, design, etc. As you can see from the sketch, I was original going to have the old man lunging from the boat at the marlin. (Maybe that was a little much... A friend later suggested an underwater battle, and I concurred!) I also tried to doodle out the important facial elements for man and marlin alike, and I worked out what I wanted the fins to look like.
2. First Pass

I draw these a little tighter, usually in blue Col-Erase pencil. You can see here that I was still obsessed with the guy jumping out of the boat, but now the marlin seems to be defending himself a little better. You can see from the sketch on the right that, based on some feedback, I decided it would be better to show the old man taking one to the jaw. (Also notice the tooth flying out of his mouth. I sort of wish I'd left this in. Oh well, maybe for the special edition.)
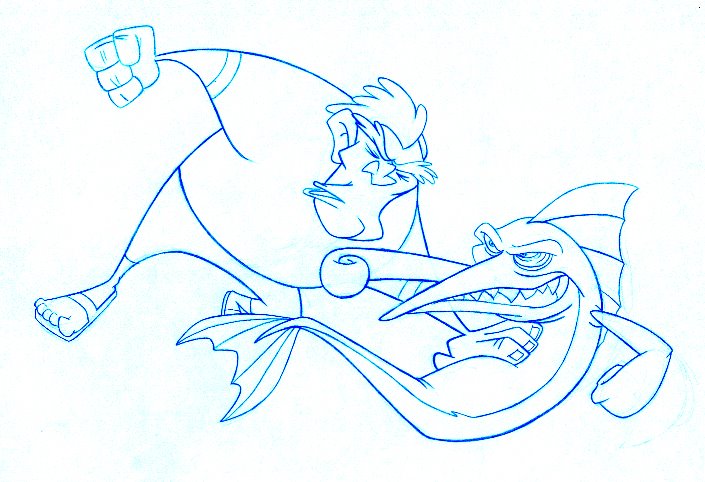 3. Final Drawing
Once again my blue pencil comes to the rescue. Usually I put the first pass drawing on my light table, set a clean sheet over it, and transfer and adapt my rough for the final. Here I had to do a bit more work, as several elements changes position. All in all, it didn't take very long to get this one ready. Once I have this, I usually ink it with Papermate felt pens, but I was able to get a nice clean line out of this one, so I just darkened the pencils digitally in Photoshop.
4. Base Colors
I take my drawing into Photoshop, adjust the blacks and whites until I'm happy, then make two layers... One layer has all background areas deleted to make them transparent (for the fill colors), and one has all white areas deleted (for the line colors). I lock the transparency on both layers, then get to work coloring. (Helpful hint: I find using the magic wand tool at 32-40% tolerance is just right for selecting the white areas you want to delete.)
 5. Tones
Usually I make a new layer between the line and color layers and set it to "Multiply" with a fill percent of 30. Then I select the areas I want to put tones in with the magic wand and airbrush the crap out of my picture, one piece at a time. An alternate technique (and the one I used here) I learned from my good pal S.T. Lewis was to select the areas you want to tone with the lasso tool and adjust the lightness with the hue and saturation tool.
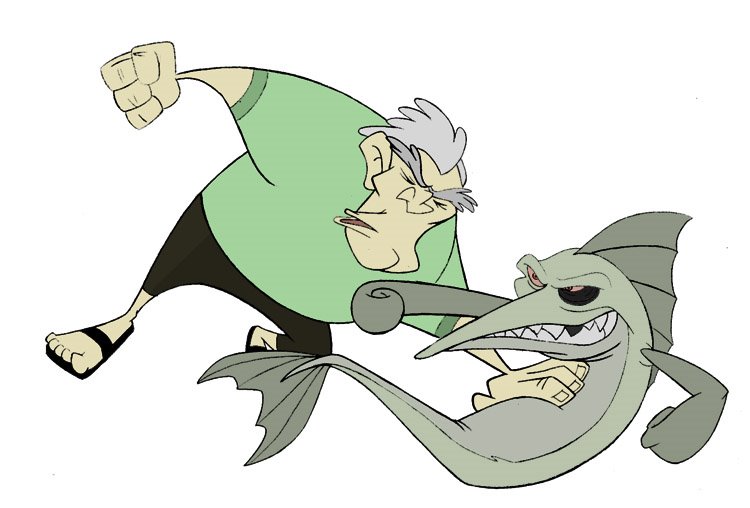
6. Zee Final Touches, Yes?
And finally, here's my picture with all the airbrushed effects and a pleasant gradient fill background. All in all, I probably spent about 1.5 hours on this one. Hope you found this useful!


3 comments:
This was a cool thing to put on here. I like seeing your development sketches and stuff. This is like having the "Art Of" book for your Toon Club sketch. If I had a different method, I'd share it. Maybe someday I'll post a similar thing on my site... and will just mock this post. But if I do that, it doesn't mean I didn't think this was cool. Because I love it!
First off, you're welcome. Secondly, yes the tooth was a great idea (again, you're welcome), and third, is there any work you do without my help anymore?
Adrian, This is priceless! I laughed out loud. And thanks for showing us your process, you've got skills.
Post a Comment